Hi again :) so just a little quick update, It’s not huge amount of crafts this week, but, i though id share with you guys a few. I am doing a few christmas gift, that I might or might not show to you in the few coming weeks.
Bird Necklaces
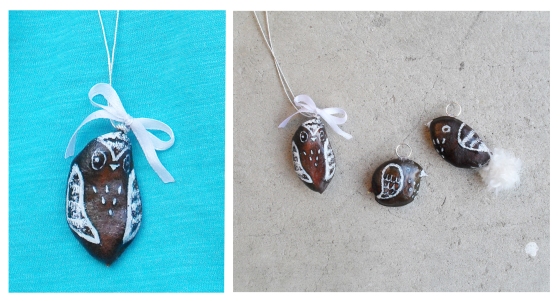
 This is a cute little thing you can do right now. These seeds can be found everywhere at the moment, and their perfect shape for birds. I used white paint, and black marker to draw my little birds. If you have white marker pen, that would probably be easier to draw with. :) Then I just used transparent nail polish to cover them up so they want come off with rain. I also hot glued on some circles so they can be connected to a necklace chain. On the little owl, I also added a ribbon.
Birthdaycard
My Best friend Gyda had her birthday on the 9 of september, and I was hoping this was going to turn up in time, but it came a bit late. This card had a little crown that you could slide off the card and put on your head, to celebrate yourself ;) I made this by measuring head size, and then staple it together , cutting little pyramids that I glued circles on. Then I covered the paper with glue and poured glitter on top. This was not the best idea, because the glitter didn’t stick well. I suggest you buy a paper that already has glitter and you save yourself and the birthday girl for a lot of mess :P sorry Gyda <3
Book Marks
Raccoon
 If you want to make your own design using my template, this is how I did it, This is offcors not the only way to do it.
On number 6 I have flipped the fox arround so that your gluing the background on the back. Just though id make that clear, if its anything else your concern or wonder about, just ask. And also if you really like these little bookmarks, you can jump online at Etsy and buy them for $3 there :) http://www.etsy.com/listing/109054940/panda-bookmark-for-your-favourit-book?ref=sr_gallery_6&ga_search_query=panda+bookmark&ga_view_type=gallery&ga_ship_to=AU&ga_min=0&ga_max=0&ga_search_type=all&ga_facet=panda+bookmark
Tooth Fairy
With this little necklace I tried to make it look like a white stone was a tooth and then I made a little tooth fairy in illustrator, printed it our and glued it on top of the stone. Then I hot glued the little norwegian coin to the back of the stone. So it’s bascically suppose to be a little tooth fairy transforming the tooth into a coin. the problem here is that the stone don’t look that much like a tooth and that the fairy is so tiny and you can’t see her very clearly. It was just a try, sometimes it work sometime it doesn’t. though id show yous anyway :)
See you again soon
xox Nani


 A have been collecting leafs, that I thought had pretty colours, and then I just put them between some pages in a thick book, and let them be there overnight so they would dry flat, Then I covered them with matt varnish so that the leafs will last longer and not lose its colours. And with a peace of thread I just randomly placed them with tiny pegs, down the tread. Then I wrote small cute messages, to go with the theme : What makes winters cozy.


